Check out our latest products
![[2025 Upgraded] Retractable Car Charger, SUPERONE 69W Car Phone Charger with Cables Fast Charging, Gifts for Men Women Car Accessories for iPhone 16 15 14 13 12, Samsung, Black](https://i1.wp.com/m.media-amazon.com/images/I/61SaegZpsSL._AC_SL1500_.jpg?w=300&resize=300,300&ssl=1)


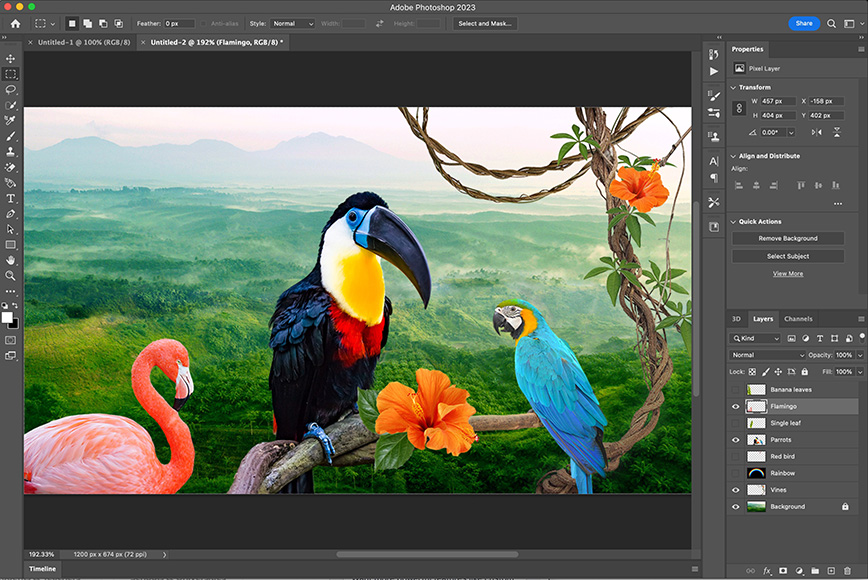
Whether you’re doing selective editing or creating a photo composite in Photoshop, everything starts with making a solid selection.
But selecting objects, especially people, has always been a time-consuming task. Thankfully, Adobe continues to add AI-powered features that make our lives easier.
In this case, I want to introduce you to the newest and most impressive one yet: the Select People tool.
Editor’s Choice
Start your free trial of Photoshop or Adobe Creative Cloud to follow along with this tutorial and learn how to streamline your workflow.
Keep on reading for a step-by-step guide on how to use it.
How to use the Select People and Select Details tool in Photoshop
If you think Select People isn’t a big step forward because we already had Select Subject, think again.
The biggest difference between the two features is that Select People identifies each subject separately. So, you can work on each person individually or together – the choice is yours.
On top of that, the Select People tool allows you to select specific parts of the subject, such as eyebrows, hair, beard, hands, nose, clothes, and more.
Let me show you how it works.
Step 1

Open a photograph with one or more people in Photoshop by launching the program on your computer.
From the home screen, there are a few ways to do this. I usually click ‘Open’ on the left-hand menu. You can also use the top menu bar and go to File > Open, or simply drag your image into the ‘Add an Image’ area under the ‘Start Something New’ section.
Step 2

Enable the Object Selection tool. You’ll find it in the toolbar—it looks like a solid square surrounded by a dotted line, with a small arrow in the bottom-right corner.
Alternatively, you can press the W key, which is the shortcut for this tool.
Step 3

Click Select People in the Options toolbar at the top of the screen.
Once you do, Photoshop will automatically begin detecting the people in your image. This usually happens quickly, though the speed can vary depending on your computer’s specs, the image size, and how complex the scene is.
Step 4

Once Photoshop has detected the people, you’ll see a small thumbnail of each one. If you hover over the thumbnail, you’ll see a mask appear on the picture, giving you a preview of the selection.
Simply click on the person you want to work with at this time.
Step 5

When you click on a person, the default mask selects the Entire Person. However, the newest Photoshop feature allows you to choose which detail of the person you want to select.
Simply hover over the list of details shown under the person’s thumbnail – you’ll see a pink preview mask on the image. To choose a detail, click on the name in the list.
You can select multiple details because clicking on a new one won’t disable the previous one.

It’s also possible to select the same details for more than one person. Simply click on the thumbnail of each person you want to include in your selection.

Once you’re done choosing which ones you want, simply click on Apply, and Photoshop will turn the masks into a selection.
Step 6

The Select People tool is very useful and, in many cases, accurate. However, it isn’t always perfect. So, make sure you zoom in and refine the selection as needed using the traditional Photoshop selection tool of your choice.
Step 7
Now, make the adjustments you want. Here are a few examples.
Step 7.1

Add an adjustment layer to change the lighting or color of the selected area.
Step 7.2

Use the Generative Fill tool to create brand new content.
Step 8
Once you’re done, you can disable the selection by pressing Cmd + D (or Ctrl + D on Windows). Alternatively, go to Select > Deselect in the top menu.
From here, you can continue editing the rest of the image or make another selection if needed.
Enjoy using this new tool. If you liked this tutorial, you might also like – 35 Creative Prompts for Photoshop Generative Fill to Try Today.
![[True Military-Grade] Car Phone Holder【2024 Stronger Suction & Clip】 Universal Cell Phone Holder for Car Mount for Dashboard Windshield Air Vent Long Arm Cell Phone Car Mount Thick Case,Black](https://i2.wp.com/m.media-amazon.com/images/I/715PBCuJezL._AC_SL1500_.jpg?w=300&resize=300,300&ssl=1)
![[エレコム] スマホショルダー ショルダーストラップ 肩掛け ストラップホールシート付属 丸紐 8mm P-STSDH2R08](https://i3.wp.com/m.media-amazon.com/images/I/51BMFf06pxL._AC_SL1500_.jpg?w=300&resize=300,300&ssl=1)