Check out our latest products
![[2025 Upgraded] Retractable Car Charger, SUPERONE 69W Car Phone Charger with Cables Fast Charging, Gifts for Men Women Car Accessories for iPhone 16 15 14 13 12, Samsung, Black](https://i1.wp.com/m.media-amazon.com/images/I/61SaegZpsSL._AC_SL1500_.jpg?w=300&resize=300,300&ssl=1)


![]()
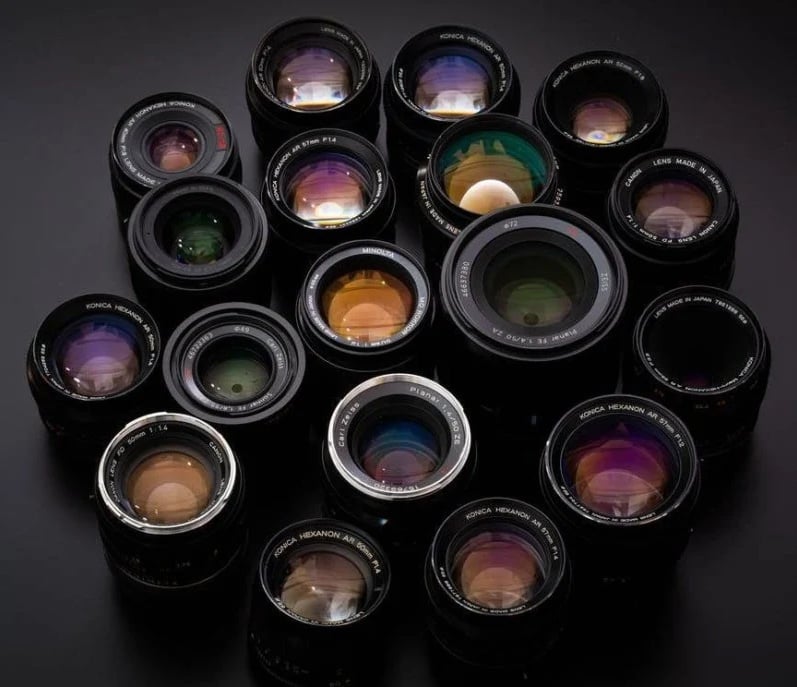
Photography is as much a science as it is an art, and nowhere is that more evident than in the construction of camera lenses. Behind every sharp image is a complex array of glass elements, coatings, and design choices that collectively shape how light is captured. Understanding how a lens is built — its elements, groupings, coatings, and design lineage — not only deepens appreciation for the gear, but also empowers photographers to make smarter choices based on their creative goals and technical needs.
In this first part of our exploration, we’ll break down the essential components of lens construction, explain their optical significance, and look at several classic design formulas that still influence modern lenses today.
Elements and Groups: The Foundation of Every Lens
What Are Lens Elements?
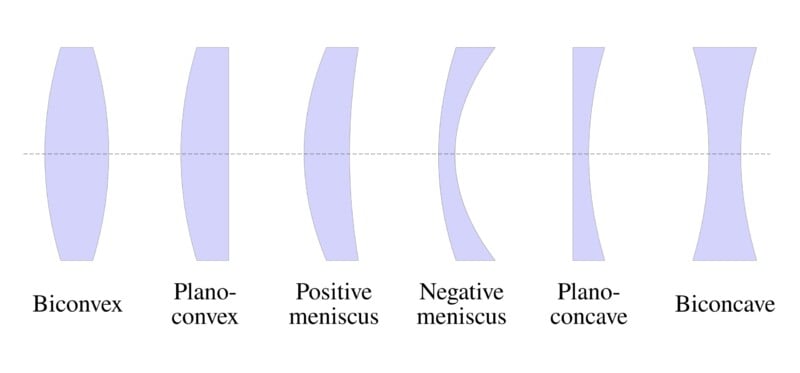
At the most basic level, a camera lens is a tube that contains multiple pieces of specially shaped glass — these are called lens elements. Each element is a single optical piece designed to bend (refract) light in a specific way. Some are convex (bulging outward), others are concave (curved inward), and many are compound surfaces (aspherical, spherical, etc.).
Light entering a lens bends as it passes through these elements so that it can be directed precisely onto the image sensor or film plane. However, the path of light isn’t simple — it needs to be bent multiple times to be corrected for aberrations, focused sharply, and projected with minimal distortion.
What Are Groups?
Elements are organized into groups, which are clusters of one or more elements that function together. Groups may consist of cemented elements — glass pieces glued together using an optical adhesive — or air-spaced pairs. A “group” typically moves as a single unit when focusing or zooming.
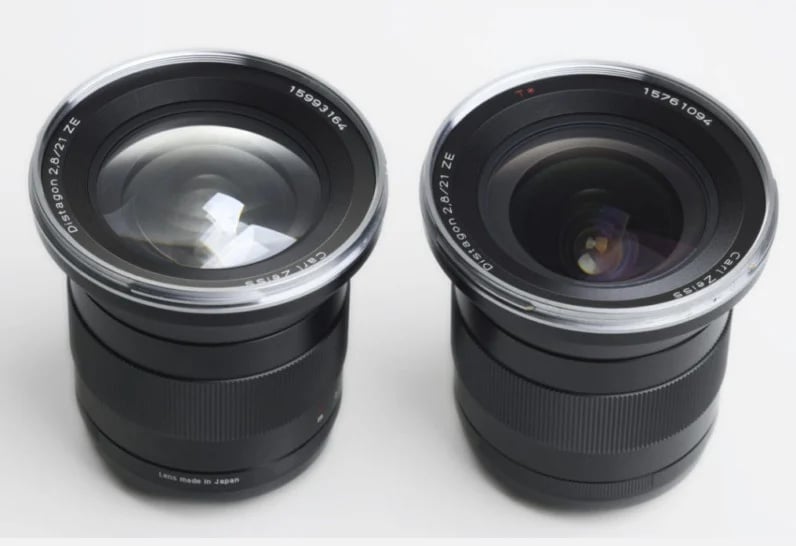
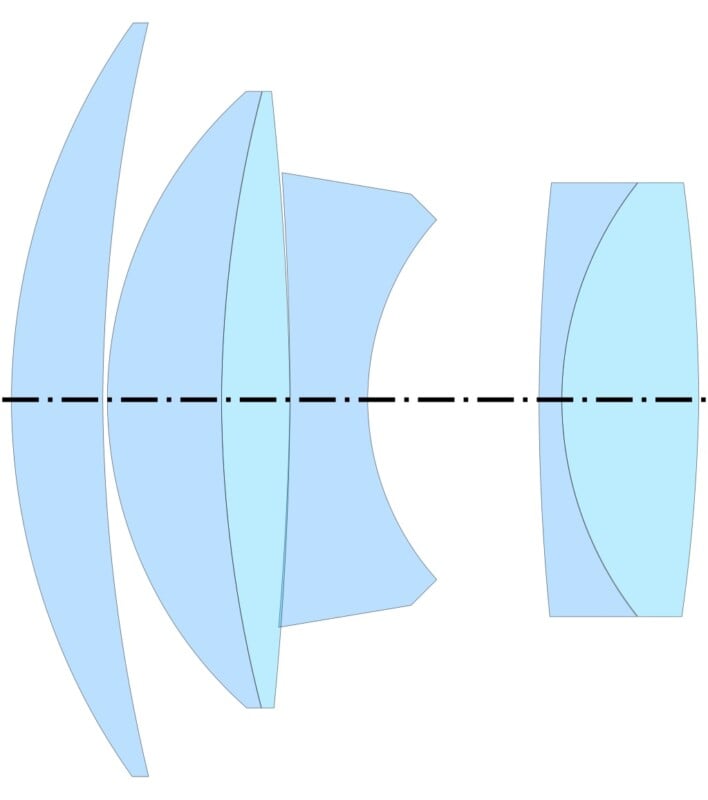
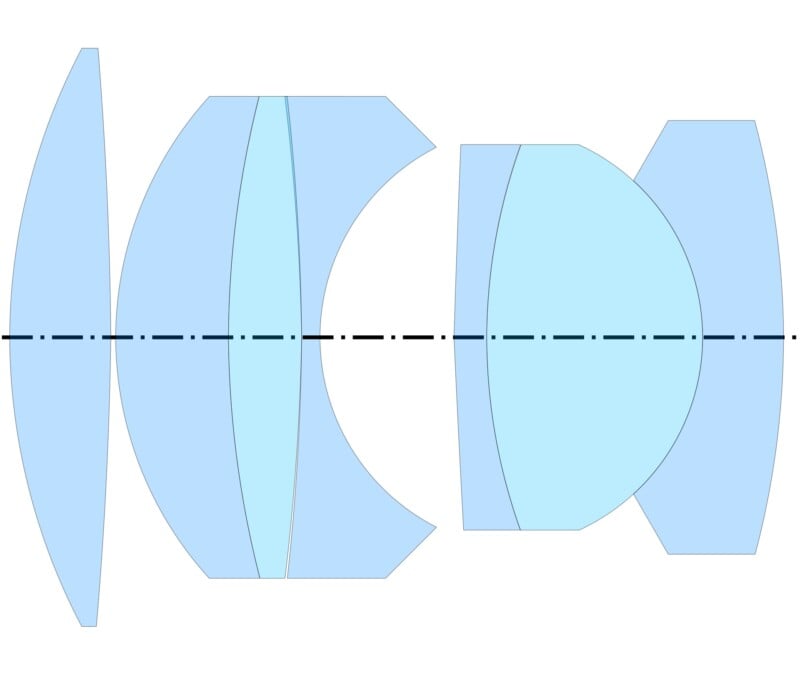
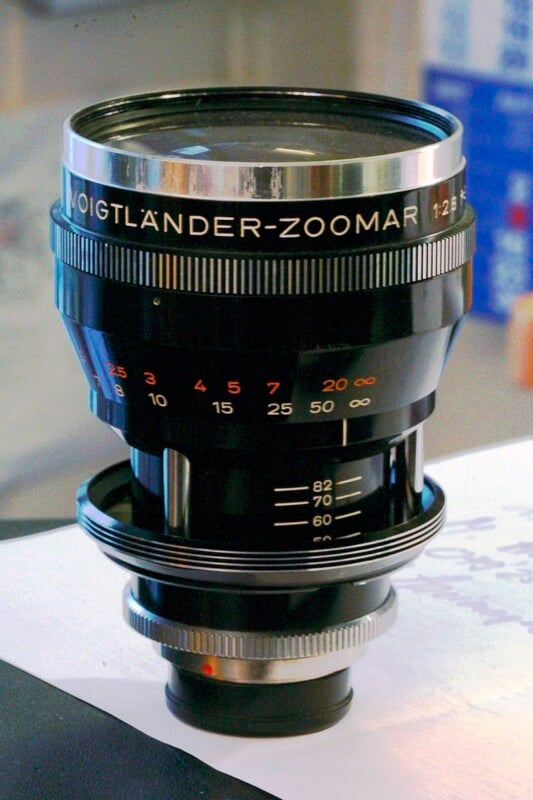
Examine these two optical diagrams:
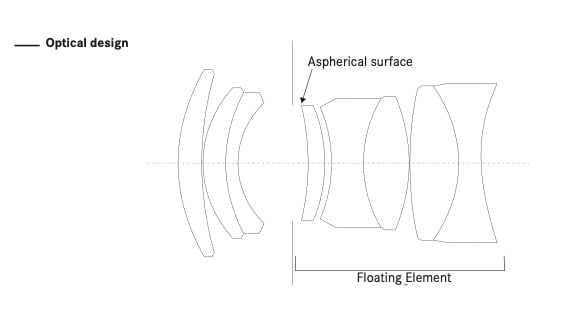
In the first, we see eight distinct elements (three in front of the aperture, five behind — which also happen to be part of a “floating elements”… more on that later). How many bonded groups do you see? That is, groupings of two or more elements with only two air-gap surfaces per group. Hopefully, you see three such groups — the two elements in the rear form one, the two elements in front of them form another, and the two negative meniscus elements near the front form a third. That makes this lens an 8 element, 5 group design.
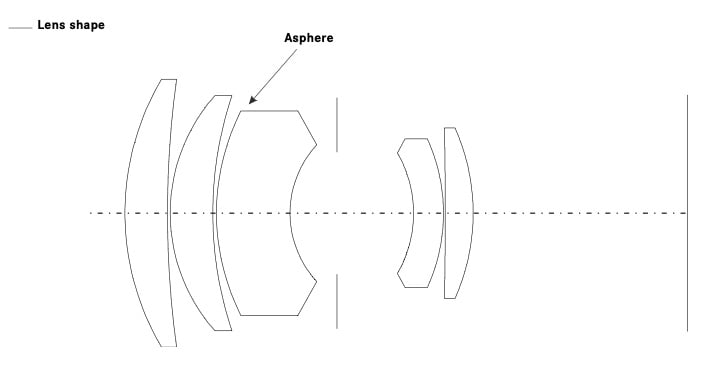
Now look at the next one. I’m sure you can easily deduce that there are five elements. How many groups? Well, since all of the elements seem to be on their own, the answer is: five. This is a 5 element, 5 group design.
Almost all lens datasheets read something like “14 elements in 10 groups.” That means the lens contains 14 pieces of glass, organized into 10 groupings. Why does this matter? Because how elements are grouped affects a lens’s complexity, weight, cost, and performance. More groups often indicate a more advanced optical design, but not necessarily a better one — it depends on the trade-offs the designers made. I mean, look at the APO-Summicron 90mm above — an excellent lens, and it’s only five elements, with the same number of groups.
Optical Coatings: The Invisible Guardians of Image Quality
While lens elements and groups define the lens’s physical structure, optical coatings have a huge effect on image performance — especially in modern digital photography.
What Are Lens Coatings?

Lens coatings — specifically, dielectric coatings, which is the type we’re concerned with — are ultra-thin layers of material applied to the outer surface of lens elements. Their primary function is to reduce internal reflections, which cause lens flare and ghosting — artifacts that degrade contrast and color fidelity. The other primary mission is to reduce the reflection coefficient as much as possible — if you’ve ever heard of T-stops (“Transmission stops,” or “true stops,” according to some), the reason they’re always slower than F-stops is because 100% transmittance will never happen. But the best coatings, like Zeiss T* or Nikon ARNEO, will get you as close as possible.
Early lenses were notorious for flare because they lacked coatings — which also means lost light that isn’t hitting the film/sensor. In the late 1880s or early 1890s, Lord Rayleigh — who discovered argon and is the man behind the term Rayleigh scattering — discovered that, seemingly counterintuitively, older glass produced brighter images than newer lenses. As it turns out, the oxidation layer in the older lenses was suppressing reflections. In 1935, Alexander Smakula, working for Zeiss, invented a process to vacuum deposit thin layers of magnesium fluoride — you’ve probably heard of fluoride in some manufacturers’ press releases — to reduce surface reflection, resulting in an effective 1 stop increase in transmission.
In 1941, the Kodak Ektra, a 35mm rangefinder, became the first camera with a line of lenses featuring antireflection coatings. Antireflection coatings now allowed the double Gauss (“Planar”) design to bloom in popularity. Before coatings, the Sonnar design was more desirable due to its six air-glass surfaces compared to the Planar’s eight.
Then, in 1956, Minolta released its Rokkor 3.5cm f/3.5 lens for its Minolta 35 Model II rangefinder, becoming the first company to release a multicoated consumer lens via its proprietary Achromatic Coating. In the 1960s/early 1970s, Zeiss and Pentax entered into a working relationship. By the way, the “Pentax” name was originally owned by VEB Zeiss Ikon (“Pentaprism” + “Contax” = “Pentax”) — Pentax officially acquired the name from Zeiss in 1957. There was much shared between the two companies during this time, but one of the biggest was Pentax’s access to Zeiss’s multicoating process, which allowed them to release their new M42 mount SMC (Super Multi-Coating) Takumar lenses in 1971. The company claimed them to be the first fully multicoated lenses for consumer cameras, though other companies had already been using multicoating processes. Fujifilm even had an 11-layer EBC (Electron Beam Coating) process in 1964, though it was only used for cinema lenses at that time. If you want to read more about the Zeiss/Pentax collaboration, this is a fantastic broad-strokes piece.
However, in the late 1970s, most lenses used multi-coating. Today, they all do — the only exceptions are some cinema lenses, such as the Sigma FF Classic Cine Primes, which feature no coatings at all. Optically, they are the same as their FF High Speed Primes, which are mostly T1.5, but the lack of coatings makes the Classics T2.5. Some other cine lenses feature only single coatings — some vintage-inspired or vintage-derivative stills lenses (e.g., Light Lens Lab) may also have single or no coated elements.
Why Are Coatings Important?
Modern coatings do more than just reduce flare. They also:
- Increase contrast in backlit conditions.
- Improve color rendering by controlling chromatic shifts.
- Minimize loss of light transmission, allowing for more light hitting the sensor/film and bringing the T-stop closer to the F-stop.
- Protect against water, oil, and dust, especially with nano-coatings or fluorine coatings on front elements.
Premium lenses often tout proprietary coating technologies like Zeiss’s T*, Nikon’s ARNEO and Nano Crystal Coat, or Fujifilm’s HT-EBC. For real-world photography — especially outdoors or in harsh lighting — coatings are a quiet but crucial part of image quality.
If you want to dive deeper into coatings, how they work, and why they’re essential (And you should! Learning is fun!), please read Timothee Cognard’s fantastic article here at Petapixel.
Optical Formulas: The Classic Designs That Changed Everything
Modern lenses often use complex, computer-aided designs with a dozen or more elements. But the roots of lens construction lie in classical optical formulas — designs that date back to the 19th and early 20th centuries. These blueprints shaped the way lenses control light and balance the eternal trio of distortion, sharpness, and chromatic aberration. Let’s explore a few of the most enduring:
Achromatic Doublet
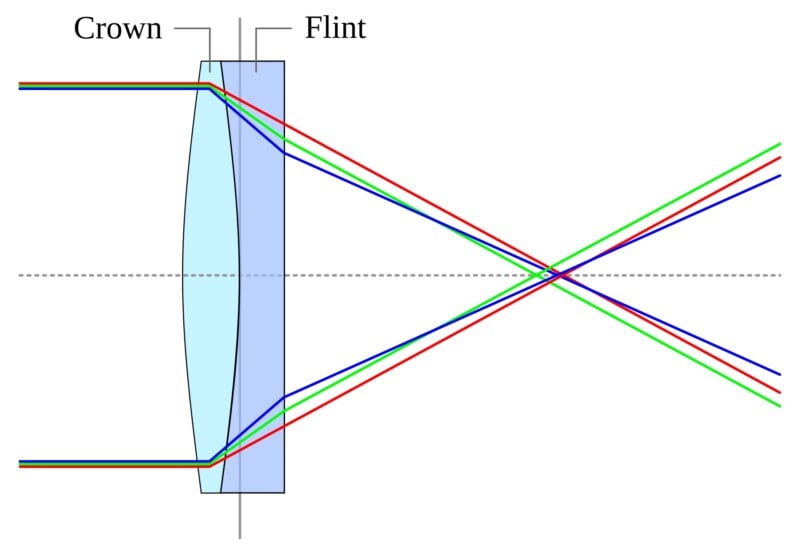
One of the earliest breakthroughs in optics was the achromatic doublet, which combines two lens elements of different glass types (typically crown and flint glass) to correct chromatic aberration. Chromatic aberration occurs when different wavelengths of light focus at different points, causing color fringing around edges.
The doublet’s innovation was to bend different wavelengths together, effectively minimizing the rainbow-like artifacts that plagued earlier lenses. Even today, many internal lens groups rely on this principle.
Cooke Triplet
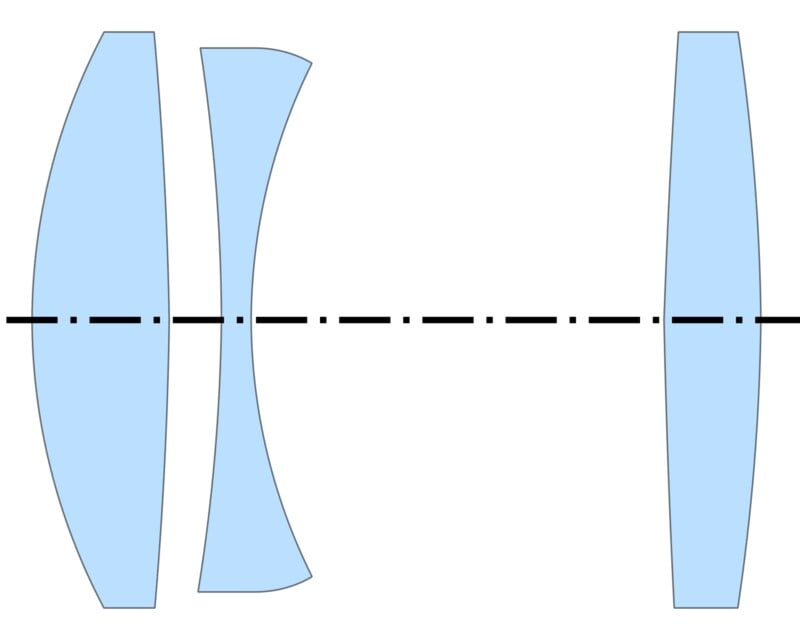
Invented in 1893 by Dennis Taylor, the Cooke Triplet added a third element to the doublet formula. This layout — a positive element in front (biconvex), a negative element in the middle (biconcave), and another positive element at the back (biconvex) — offered significantly better correction of spherical and chromatic aberrations.
It’s often regarded as the grandfather of modern photographic optics. Many 20th-century lenses, especially in compact cameras, evolved from this formula due to its simplicity and excellent image quality at modest apertures.
Taylor conceived of the lens by imagining a cemented doublet, with each element having equal power — the result would be a compound lens with zero net power but a flat field of focus. He theorized that if he separated the two elements, the air gap would act as an additional element, resulting in a net positive power while still retaining the flat field. The Cooke triplet thus features a negative flint glass element with a positive crown glass element on either side. The Petzel sum of such a design is zero (ergo, the field of focus is flat).
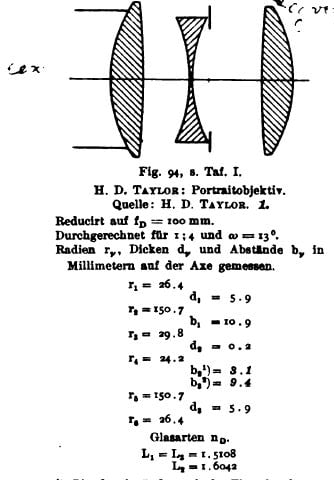
The Cooke triplet was a massive milestone in lens design. It became the first design to correct all five Seidel aberrations: spherical aberration, coma, astigmatism, Petzval field curvature, and distortion. While the design was later surpassed by more complex and superior designs such as the double Gauss (Planar) or Sonnar designs, it always remained popular, particularly in compact cameras and, to this day, in smartphones. So advanced was the design that essentially every other manufacturer adopted it in some form: Zeiss had the Triotar, Meyer Optik had the Domiplan and Trioplan, Steinheil had the Cassar and Cassarit, Leica’s Elmar (some of them), Schneider Kreuznach Radionar, and so on and so on. Triplet designs remained very popular in large format photographic lenses for many years, as well.
Tessar: The Classic

First designed by Paul Rudolph for Zeiss in 1902, the Tessar is one of the most legendary lens formulas in photographic history. Its configuration includes 4 elements in 3 groups: A front positive crown glass element, a negative flint glass element in the center, and a negative group at the rear comprised of a negative concave flint glass element bonded to a positive convex crown glass element.
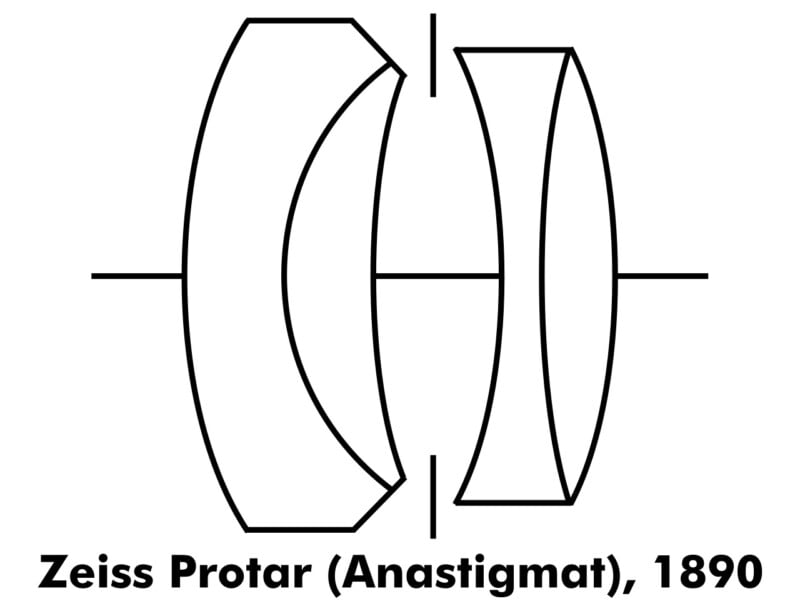
Despite what many believe, the Tessar did not develop from the Cooke triplet, but instead was created in parallel based on Paul Rudolph’s 1890 Anastigmat lens (which contained 4 elements in 2 groups) — also known as the Zeiss Protar. In 1895, Rudolph patented the Stigmatic lens for Dallmeyer and applied some of his discoveries on that lens to his Anastigmat design. This resulted in the Unar in 1899, which featured four air-spaced elements. Then, in 1902, Rudolph determined that the cemented groups of the Anastigmat and Dallmeyer Stigmatic had numerous benefits; so, he inserted a cemented doublet into the rear of the Unar… thus creating the Zeiss Tessar (Tessar is derived from the Greek word for “four”).
The Tessar is renowned for producing sharp, contrasty images with relatively few elements, making it ideal for small primes with modest apertures (usually no faster than f/2.8, with some exceptions). It earned nicknames like “The Eagle Eye” due to its clarity and was widely used in compact 35mm cameras. In fact, if you look at the design of almost any fixed focal length, pocketable 35mm camera, it might very likely sport a Tessar or Tessar-derived design. The Rollei 35/3.5 lens, Minox 35/2.8 Minotar and Minoxar lenses, and Olympus mju (aka Stylus Epic) are all fitted with Tessar lenses.


It doesn’t stop at compacts either — lenses like the Nikkor AI 45mm f/2.8 P, Minolta Rokkor 45mm f/2.8, Voigtlander Color-Skopar 50mm f/2.8, KMZ Industar 50mm f/3.5 — the list goes on. All Tessar designs. Tessars were especially popular with medium format TLRs: Yashica Yashinon 80mm (Yashica TLRs), Minolta Rokkor 75mm f/3.5 (Minolta Autocord), Schneider Xenar 75mm f/3.5 (Rolleicord), Meopta Belar 80mm f/3.5 (Flexaret), and Rikenon 80mm f/3.5 (Ricoh Diacord), to name a few.
Tessar lenses tend to have excellent center sharpness but fall off slightly at the edges — acceptable for most uses, especially considering their size and simplicity. Many modern pancake lenses are still Tessar variants.
Double Gauss / Planar: The Foundation of Fast Lenses
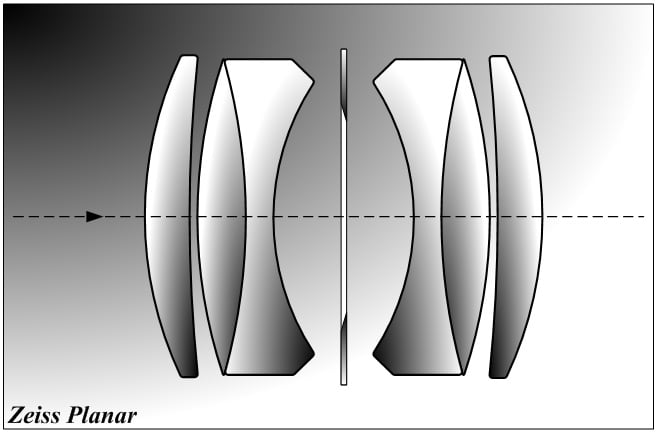
One of the most influential and enduring optical designs is the Double Gauss, which evolved from Carl Gauss’s 1817 telescope lens and was revolutionized in photographic form by Zeiss’s Planar in the 1890s and 1930s.
Structure:
- Typically 6 or 7 elements in symmetric pairs
- A pair of positive meniscus elements surrounding a central negative group
This symmetrical design is prized for its ability to produce wide apertures (f/2, f/1.4, or faster) while minimizing spherical aberration, field curvature, and distortion. It’s the basis of many “nifty fifties” (standard 50mm f/1.8 lenses), and variations of it appear in dozens of classic fast primes.

The Planar and its descendants offer excellent sharpness, low distortion, and a pleasing, smooth out-of-focus rendering — what photographers call bokeh. Modern iterations may include aspherical or low-dispersion elements, but their DNA traces back to the Double Gauss.
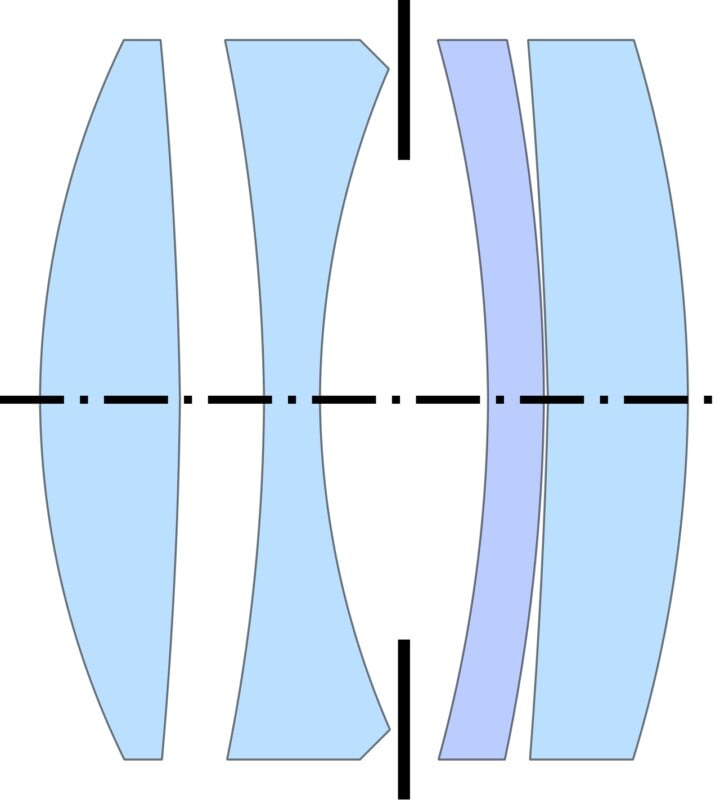
Sonnar: Compact, High-Contrast Design
The Sonnar is another Zeiss invention, developed by Ludwig Bertele in the 1930s. Its hallmark is fewer air-glass interfaces, meaning fewer reflections and higher contrast.
Typical Structure:
- 5 to 7 elements in 3 groups
- Rear elements are thick and close to the film plane
Sonnar lenses are often faster (f/1.5, f/2) than Tessars but more compact than Double Gauss designs, which made them ideal for rangefinder cameras. Their contrast-rich rendering and distinctive bokeh made them beloved for portrait and street photography.
However, Sonnars can suffer from focus shift when stopped down — a challenge for digital users using manual focus. The modern Zeiss ZM 50mm f/1.5 Sonnar is notorious for its focus shift.
Still, their unique rendering is prized by enthusiasts and vintage lens collectors alike.

Retrofocus (Inverted Telephoto)
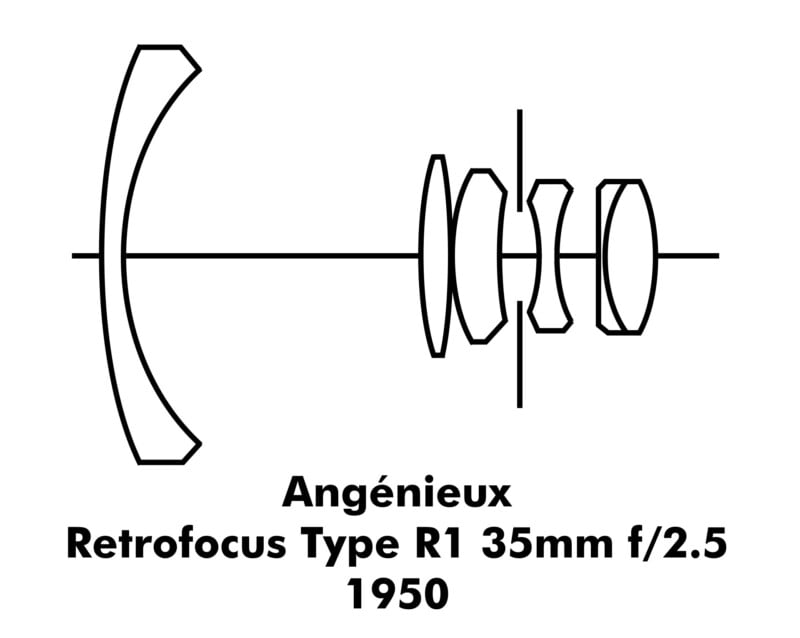
One major problem emerged when Single-Lens Reflex (SLR) cameras rose to prominence: the mirror box needed space behind the lens. Traditional wide-angle lenses couldn’t sit far enough from the film plane, so designers flipped the telephoto principle.
A telephoto lens combines positive and negative groups (with negative at the rear), magnifying the image and reducing the back focal distance to a number shorter than the lens’s focal length. This allows telephoto lenses to be shorter than their focal length.
The inverted telephoto design does the exact opposite. It uses one or more negative lens groups at the front to increase the back focal distance to something greater than the lens’s focal length. This allows interior parts — like a flippy mirror — to sit behind the lens, while still achieving a wide-angle field of view.
The inverted telephoto design was first put into practice by Taylor-Hobson in the 1930s. The Technicolor 3-strip process at the time — which required the cameras to have a beam splitter behind the lens — necessitated long back focal distances and therefore an inverted telephoto design for anything wider than 50mm.

Thus, in 1930, Horace Lee of Taylor-Hobson patented an inverted telephoto design lens with an angle of view of 50 degrees and a maximum aperture of f/2. I assume the AOV refers to 35mm motion picture film, which would place the focal length right around 28mm.
In 1949, Harry Zöllner and Rudolf Solisch completed the design of the Zeiss Jena Flektogon 35mm f/2.8, which was then presented at the Leipzig Spring Fair in March of 1950.
Pierre Angénieux’s patent application quickly followed this in 1950, where he described two lenses with a 65-degree AOV (approximately 35mm in 36x24mm stills format) — one had a maximum aperture of f/2.5 and the other f/2.2. Angénieux then coined the name “Retrofocus” for its inverted telephoto lenses, and eventually the two terms became interchangeable.
Benefits:
- Enables wide-angle focal lengths with long back focus
- Allows room for SLR mirror mechanisms
- Adaptable to modern digital sensors with large flange distances
Retrofocus designs are inherently more complex and can introduce distortion or field curvature, especially in cheaper models. However, many modern wide-angle primes and zooms — especially DSLR-era lenses — owe their existence to this clever optical workaround.
Aspherical Elements: Precision and Compactness
Traditional lens elements are typically spherical — that is, their surfaces are portions of a perfect sphere. While easier to manufacture, spherical lenses introduce spherical aberration, especially at wide apertures. This occurs because light rays entering near the edge of the lens focus at a slightly different point than rays entering near the center, reducing sharpness and contrast.
Aspherical elements have a surface curvature that changes from center to edge. This non-spherical profile allows them to correct for spherical aberration, astigmatism, and other distortions using fewer elements. In this sense, they can often be more economical to employ, as one element can take the place of several.
Why Are They Important?
- Sharper images, particularly at wide apertures.
- More compact designs, because fewer elements are needed for correction.
- Improved bokeh, since spherical aberration is controlled without harsh transitions.
- Less coma, which improves point-light rendering in night or astrophotography.
Aspherical elements were once reserved for exotic lenses due to manufacturing challenges. Today, advanced molding and hybrid methods have made them common in midrange and even budget optics, especially zooms and fast primes. Look for abbreviations like “AS” (Pentax), “ASP” (Sigma), or “XA” (Sony’s extreme asphericals) in lens names.
Internal and Rear Focusing: Speed and Stability
Many modern lenses use internal focusing (IF) or rear focusing (RF) systems. Instead of moving the entire optical assembly during focus, only certain internal groups are moved.
Benefits of Internal/Rear Focusing
- Faster autofocus due to lighter moving parts.
- Non-rotating front elements, which are ideal for using polarizers or graduated filters.
- Better balance, especially on longer telephoto lenses.
- Improved weather sealing, since fewer moving external parts means fewer entry points for dust and moisture.
Internal focusing is now standard in most mid-range and high-end lenses, particularly zooms and telephotos. It’s not just a convenience — it also contributes to better optical performance, since it allows for more sophisticated element movement.
Floating Elements: Maintaining Sharpness Across Distances
A lens is typically optimized for sharp focus at a certain distance — with the exception of macro lenses, this is usually infinity. However, when focusing closer, image quality can degrade due to field curvature and other aberrations as the len’s internal elements are shifted around.
To address this, some lenses include a floating element group (sometimes called a “close-range correction system”). These elements move independently of the main focusing group to maintain optimal spacing and alignment between elements at various focus distances, thus ensuring consistent performance throughout the entire focusing range.

Why Floating Elements Matter
- Better close-up performance, especially with fast primes.
- Less focus shift, which occurs when the point of best focus changes as you stop down the aperture.
- Higher resolution at medium distances, such as for portraiture or documentary work.
Floating elements are often found in macro lenses or fast wide-angle primes where optical tolerances are tight. They’re a sign of a well-corrected design — and a good reason why some expensive lenses earn their keep.
Zoom Lenses: Variable Focal Length, Constant Complexity
While primes have fixed focal lengths, zoom lenses vary their angle of view and focal length by shifting internal elements. This requires intricate engineering — especially if the zoom is to maintain a constant aperture or high image quality across the range.
Zoom Design Terminology
- Varifocal: Focus changes when zooming (common in cheaper lenses).
- Parfocal: Maintains focus while zooming — valuable in video work.
- Constant aperture zooms: The lens maintains a consistent maximum aperture throughout the zoom range (e.g., f/2.8).
- Push-pull vs. rotary zooms: Older zooms often used a single push-pull ring, while modern lenses favor two-ring rotary designs for precision.
Optical Challenges in Zoom Lenses
To make a zoom lens that performs well across a range, designers must correct:
- Distortion, which changes shape as you zoom.
- Field curvature, particularly problematic in wide-to-tele zooms.
- Chromatic aberration, especially at the long end.
- Vignetting, most visible at wide apertures.

Modern premium zooms — like the Sony GM, Canon L, or Nikon S lines — pack 15–20 (and sometimes even more) elements in elaborate groupings to handle these variables. When selecting a zoom, photographers should consider how consistent the performance is across the focal range — many reviews highlight corner sharpness, distortion charts, and real-world rendering, and the best reviews will generally test zoom lenses at three or more focal lengths (the wide end, the long end, and somewhere in the middle).
Image Stabilization Systems
Many lenses now include optical image stabilization (OIS or IS), which utilizes moving lens elements to compensate for camera shake. While this isn’t strictly part of optical design in the traditional sense, it’s critical for usability.
Stabilization is especially valuable for:
- Telephoto lenses, which exaggerate small movements.
- Low-light shooting, where slow shutter speeds would otherwise require a tripod.
- Video, where handheld jitter can ruin footage.
Some systems even correct for both angular and shift movement. Meanwhile, modern mirrorless cameras increasingly combine in-body stabilization (IBIS) with lens-based stabilization, syncing their motion correction systems for greater effect, such as with like OM System’s Sync IS or Panasonic’s Dual I.S. If you’ve ever heard a manufacturer claim their camera has “5-axis IBIS,” that’s when the camera’s stabilization is synced with the lens’s optical stabilization.
Practical Considerations for Photographers
So, how does all this affect your day-to-day photography? Here’s a summary of why lens construction matters:
|
Feature |
Why It Matters |
| Aspherical (“ASPH”) Elements | Sharper, smaller lenses; better wide-open performance |
| ED/UD/FLD Glass | Reduces color fringing, improves detail |
| Floating Elements | Ensures close-up sharpness, reduces focus shift |
| Internal Focusing | Faster, quieter AF; better weather sealing |
| Image Stabilization | Enables handheld shooting at slower shutter speeds |
| Zoom Group Design | Affects sharpness, distortion, and usability |
| Lens Coatings | Improves contrast, reduces flare and ghosting |
| Apochromatic (“APO”) | Free (or nearly free) from spherical and chromatic aberrations; improves perceptual sharpness |
Choosing the right lens isn’t just about focal length or brand loyalty. Understanding construction helps you match a lens to your shooting style, subject matter, and image quality expectations. A landscape photographer might prioritize edge-to-edge sharpness and flare resistance, while a portrait shooter may care more about smooth bokeh and low chromatic aberration.
Even vintage lenses come alive when you understand their optical heritage — Sonnars for dreamy portraits, Planars for clinical sharpness, Tessars for compact walk-around kits.
Yes, It’s Probably A Lot, But It’s Worth Learning.
Lens construction is more than a list of specs — it’s a story of how glass, engineering, and physics converge to capture light. From classic formulas like the Cooke Triplet and Double Gauss to modern marvels with floating elements and aspherical surfaces, every lens embodies a set of optical decisions designed to solve a particular problem or meet a specific need.
By understanding these fundamentals, photographers can better appreciate their tools and make more informed choices about the gear they use. After all, behind every memorable image is a lens that bent light just the right way.
Image credits: Header photo licensed via Depositphotos
.
![[True Military-Grade] Car Phone Holder【2024 Stronger Suction & Clip】 Universal Cell Phone Holder for Car Mount for Dashboard Windshield Air Vent Long Arm Cell Phone Car Mount Thick Case,Black](https://i2.wp.com/m.media-amazon.com/images/I/715PBCuJezL._AC_SL1500_.jpg?w=300&resize=300,300&ssl=1)
![[エレコム] スマホショルダー ショルダーストラップ 肩掛け ストラップホールシート付属 丸紐 8mm P-STSDH2R08](https://i3.wp.com/m.media-amazon.com/images/I/51BMFf06pxL._AC_SL1500_.jpg?w=300&resize=300,300&ssl=1)